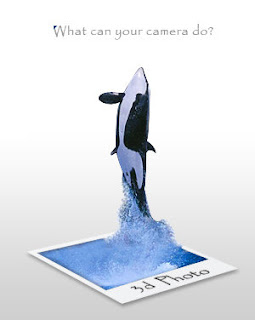
3D Poloroid | |||||||||
We'll begin this tutorial, by creating a new canvas at a size of 300 x 376 then select the "Pen Tool". Draw the below shape as illustrated using White as the color. | |||||||||
 | |||||||||
| |||||||||
| |||||||||
You should now have the below image. | |||||||||
 | |||||||||
Next, duplicate the Photo layer, then clear the layer style by right clicking on the layer in the layers palette and selecting "Clear Layer Style". Then go to the main menu and select "Edit" then "Free Transform" and decrease both the width and the height by 10%. | |||||||||
 | |||||||||
Next we will need to move the bottom two anchor points. To do this select the "Direct Selection Tool" | |||||||||
 | |||||||||
Next, duplicate the bottom Photo layer again , then clear the layer style by right clicking on the layer in the layers palette and selecting "Clear Layer Style" as done before. Change the color to black then move the shape down as illustrated below. | |||||||||
 | |||||||||
Next go to the main menu and select "Filter" then "Blur" and lastly "Gaussian Blur" and use the below settings. | |||||||||
 | |||||||||
Using the "Eraser Tool" you can rid the black from the blur that we did in the previous step where the arrows point to below. You should now have the below image. | |||||||||
 | |||||||||
Next, find an image that you would like to use and put above all other layers in the layers palette. I will be using the below image. | |||||||||
 | |||||||||
Now you will need to pen/trace the whale and some of the water splashes. To make things easier, I turned down the opacity on the whale image so I could see exactly where the Poloroid graphic was placed. Then grab the "Pen Tool" and begin to pen out, in this example, the whale and splashes. Midway through this process, I turned the opacity of the shape layer down to 0%. | |||||||||
 | |||||||||
Now "Ctrl" click the new shape layer to create a selection around it then delete it. The below selection shows my shape path. Then go to the main menu once again and click on "Select" and lastly "Inverse" then go to "Edit" and lastly "Cut". | |||||||||
 | |||||||||
You should now have the below image. | |||||||||
 | |||||||||
Now select the "Eraser Tool" and select the below Splatter brush. Then patiently start single clicking around the stem of the splash on both the left and right side. | |||||||||
 | |||||||||
You'll notice two arrows pointing to an outline of the pool in the background. To rid this, select the "Clone Tool" and select a soft 15 pixel brush. Then to select the area of the image you want to cover this with, hit "Ctrl" on the keyboard once, then start click-dragging to cover the outline/pool area. This will take some time to get it perfect. | |||||||||
 | |||||||||
You should now have the below image. | |||||||||
 | |||||||||
Now "Ctrl" click the image window layer to create a selection around it as I have done below. Then select the "Brush Tool" with a soft 10 pixel brush (color Black), create a new layer, above the Orca layer, then begin to paint along all the edges except the top right corner where the Orca is. Deselect the selection. | |||||||||
 | |||||||||
The Results!!! | |||||||||
As you can see, the color of the water has been slightly altered and the title "3d photo" was added to the finished Poloroid. I hope you enjoyed this tutorial. | |||||||||


0 komentar:
Posting Komentar