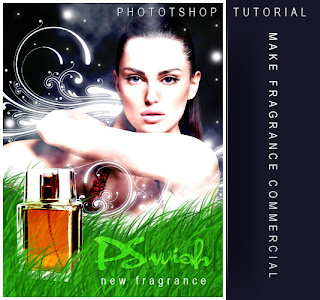
 This tutorial will teach you how to make your very own fragrance advertisements, and even though we chose to use Monica Beluci in this tutorial, you can turn any ordinary home-made picture into a fragrance advertisement billboard. So first of all you need a picture of a girl (or boy you are doing to use. Pictures of people against black or dark backgrounds are better, since we will try to create an illusion of nocturnal sky.
___________________________________________________________________
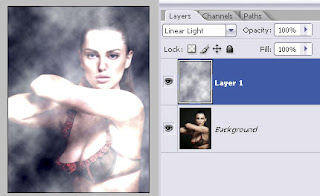 Once you opened a new canvas with the desired dimensions of your billboard, create a new layer and fill it with any dark blue or dark purple hue, we used #210a3a. Make sure that your ‘background’ colour is set to white, and go to Filter >> Render >> Clouds. This will will your upper layer with nice foggy fibber texture. Set the overlay settings of this clouds layer to “Linear Light” (see illustration).
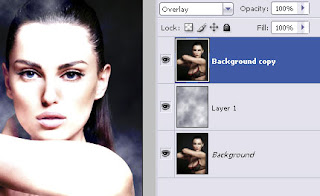
 Our aim is to create a nicely high contrasted photo with a pit of fog and glow effect as well as make the background look like a night sky. SO, what we are going to do it, duplicate the photo of the girl, drag it (in the layer’s panel) on top of other 2 layers, and set this layer’s settings to “Overlay”
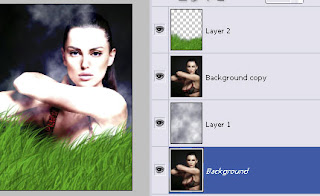 Next step is filling the bottom of the billboard with grass. This is the easiest part although I noticed that many get stuck here. We will be using the brush tool, with a default Photoshop CS2 brush called “brush dune”. You should have it. Set your foreground color to green (any hue, up to you, as long as it gives a natural look) and fill the bottom of the screen more or less like you see on the picture. The default settings for this brush are set to “scattering” so you don’t need to do much work except for just not overdoing the grass over the photo.
 Next step is adding twirly shape.
If you don’t have any nice and twirly shape, you can download mine in PSD format HERE.
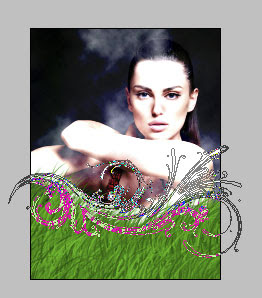
So you will either select a custom shape tool and draw any twirly shape of your choice, or take mine from the PSD file, drag and drop it to your canvas. Place the shame Between the girl’s layer and the grass (see below). Next, duplicate the shape later, transform it horizontally (or vertically, depending on your shape) and place it more or less as you can see on the illustration below.
 __________________________________________________________________
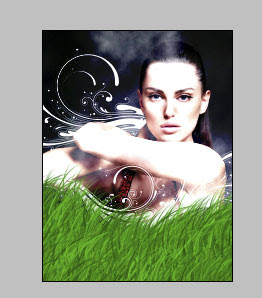 The idea is, to make the shape look as it’s behind the lady, so rasterize the upper shape’s layer and choose the Eraser Tool. Carefully remove the shape from the girl’s body. I’d suggest to use an eraser tool with hard edge, however if you want to nicely blend it with the fog effect on the background and not to make the edge too sharp, I suggest to use a 20px soft edge eraser tool.
 Next step is adding glow. Make sure the upper shape is selected in your layers panel and go to Layer >> Layer styles >> Outer Glow. Apply the following glow settings using the white color. Repeat the same action for the first shape as well.
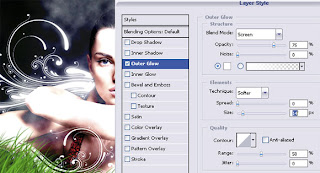
And this is what you got so far… You may also apply a few chaotic white dots, using the bruh tool and add glow, this will imitate stars on the background. This is optional, if you feel your background is too dull.
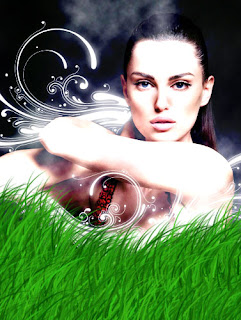
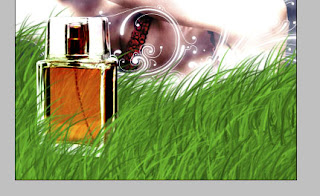 If you are making a fragrance billboard you will need a perfume bottle, but again this could be replaced with any other product you are going to “sell”. We went withfragrance bottle from sxc.hu. Most important is to crop it properly and then find a good location for it on your billboard.
Once you have located it, it could be a good idea to add a little transparency to the glass so that you’d see the grass from underneath it. We just duplicated the layer and set one of them on “overlay”, the other on “soft” so we can see the grass through yet the bottle does not become semi-visible.
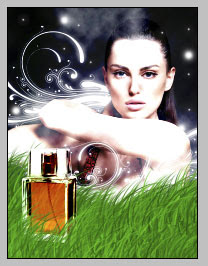 After this, make a new layer on top of all the others, select the brush tool again, using the “dune grass” brush shape, and add a bit more grass over the perfume bottle itself, to create the illusion as it sits “inside” the grass field. That’s it. Add text and your Fragrance Commercial is ready to go up on New Yorks’ streets!


0 komentar:
Posting Komentar